Wednesday, December 26, 2012

First fire fail


Parker was super nice to offer to make a fire for me. It was the first night this whole year that it was going to freeze so we thought it would be fitting.

Parker got all the fixings for the fire and the Eagle Scout in him set up a great looking fire. Here he is working away! Don't you like our fireplace by the way?
Pretty fire with the stockings hung with care.
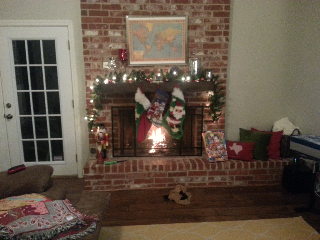
What we did not think of was how the house would smell after we made the fire with wood from the backyard. So although the fire was gorgeous and we enjoyed it, it also STANK!!!! So three weeks later our house still smells like fire and we will not be setting a real fire in there again. At least until we can figure out how to make sure the house will not stink after we have one.

Any thoughts?

Thursday, December 20, 2012

An $89 Headboard

I know it has been forever, sorry about that. We have been super busy celebrating lots of family birthdays and the holidays. But We have also been busy doing stuff around the house. The most significant would probably be the new headboard I made with my mother in law and Parker over the Thanksgiving holiday.

I had been planning on making this headboard for a while. It was always a "When I find the right fabric, or time to make it I will". Well with MIL on hand and time to do it I felt it was go time in the house.

MIL and I headed over to a new fabric store and they just so happened to have the exact fabric I had been looking for. It is nice and heavy and fairly neutral so if I wanted to change the colors of the room or our bedding I could.

After buying 3 yards of the fabric, a bunch of extra thick batting, a piece of plywood (cut in half to fit in our car), extra long screws, nuts and bolts and some 2x4 pieces to be the legs we hauled everything back to the house and got started. Every one of the tutorials I read about said this was a super easy project and I was hoping to be done with it in just a few hours. Well, it was fairly easy but it took a lot more time than I had planned.

First we assembled the plywood and screwed the pieces together with a remnant to reinforce it. We then began to wrap the headboard like a present with the first and then a second layer of extra thick batting. Here is what it looked like after both layers were stapled onto the plywood.

Then we wrapped the whole head board in the fabric making sure it was laying flat and pulled tightly around the batting. We wanted to make sure it looked even and no pulling effect was happening so we took our time and used a lot of staples. Here is what it looked like without the legs attached and after about two hours of work. pretty nice right?

Then we began the next day with attaching the legs to the headboard. This is where we ended up having a problem. See the back of the headboard had become super thick because we had been folding the batting and then the fabric down and stapling it. so when we went to screw in the legs the fabric keept getting caught on the screws and the legs would not attach. To our horror we realized we needed to take the fabric off and attach the legs directly to the plywood and then re-wrap the legs with the fabric. After many hours of fussing with the legs and the MIL helping me figure it all our we finally were ready to attach the headboard to the bed frame.

After fussing with the bolts and getting everything even and attached we finally could see the fruits of our labor. I think it came out awesome! The whole thing cost me $89 not the close to $2000 I was going to spend on the bed frame I love from Crate and Barrel. Luckily now we have more cash saved up for the bathroom renovation we are plotting for spring of next year. Woot!


Wednesday, October 24, 2012

What am I supposed to do with this?

Apparently we need to get out trees trimmed!

I came home the other night to this in our front lawn! What the heck? Our neighbor told us that we had some high winds in the area. I did not notice that, but I guess he is right.

These trees are pretty large in the front of the house. We are very lucky that nothing happened to the house. There was no damage to the roof, and to the lawn really. I can't believe it! I am hoping Parker will write a post for you all about breaking down the tree and disposal. He even got to use a chainsaw!

Hope all is going well with you all! I will be posting about our Halloween decor and more later this week!


Thursday, October 4, 2012

Master of Arts

As I mentioned to you the other week I made some home made art for Parker for our annaversary. I wanted to save money and be creative this year and I think I accomplished both! Two years is your cotton anniversary. Well since we did not have a met yet I did not want to get sheets wich is the obviousl cotton gift. I also did not want to get Parker any clothes as we are both working hard to loose some weight and I was not sure if it would fit him once he did.

So I came up with the idea of making art on canvas. I have seen a dew other blogs do the same thing and I figured I could pull it off. I used a coupon and bought two canvases on sale and Jo Ann's and then use paint samples we already had. In the end I probably only spent around $15 on the whole thing.

Once I gathered my materials I got to painting. I had seen a few ideas for what I wanted to paint but in the end chose the words from the long we walked down the ilse to at our wedding. The Beatles are my mom's favorite and I have always loved this song.

Here is how my first attempt at home made art came out. What do you think?
I know, it is kind of awesome! I love the whole look! The colors just happened to go well together in the room and they were free!

After Parker got his gift we decided to hang it up for the world to see. I like that it is right next to our bed reminding us of our special day and a good message to live by.
After hanging this artwork up I decided to hang other art up in the room. Hey, it's been 5 months I guess it is time. Next I hung up a map of Venice over Parker's new dresser. I also put out a picture of the family ad an eagle that his mom recently gave us from when Parker earned his eagle scout. I love the way this looks.
Above is a picture Parker's grandma painted and Parker's mom gave us just after we moved in together. I have always liked it and imagined having it in a special place in our home. I think it brightens up the muted colors in the rest of the room well.

So there you have it. We now have stuff to look at in our room. Things are slowly coming together in the house. It is amazing to me that even 5 months into living here I still feel like we are just moving in. I hope you like what we are doing with the place. We sure do! :)

Wednesday, October 3, 2012

Fit for a king

The evolution of our bedroom started a few years back when I found some great pillows at a sale at Dillards. Since then I have been trying to make our master bedroom feel less like a broker 20 year-old’s bedroom or like my mom’s house (no offense mom!) and more like OUR house. I have discovered this is the challenge for a lot of young couples starting out. Not only are you just getting started on your life together but then you have to cross the bridges of who gets to have what in their own bedroom. The fact of the matter is it takes time. That is what this post is about; the evolution of our bedroom’s style over time.

So with that let’s take a look back at the first picture I have after I bought some pillows on sale at Dillards just after we got married in January of 2011. We were using Parker’s bed and my old bed frame, and tables that I have had since college. Also know this picture was taken in our old apartment at night so it really looks super dark in there. It was much less cave like in person.

After a visit to my good friend Sarah’s house in Philadelphia I got inspired to get a more traditional quilt for our bed. After looking around a bit I found a really cute quilt at Marshalls for something like $30. I had the wherewithal to buy a king sized quilt knowing that we would eventually buy a bigger bed.You can see it on the bed in the picture below. When we moved into our new house, with a much bigger bedroom our bed looked very out of place in the space. It actually looked tiny! Here is a picture just after we moved in.

 After a few more months of sleeping on this bedframe and mattress in the house Parker and I decided it was time to finally upgrade. Between his back pain and my hip pain we knew that us wanting a mattress was not just about vanity but also comfort. We had actually been trying to wait until Christmas this year so we could give the bed to each other. We figured though, it was best to try and get the bed now instead of continuing to sleep on a mattress we no longer we comfortable on. So without further a due, here it is in all its glory!

Isn’t she pretty? We ended up going with a traditional coil bed after much debate about getting a foam mattress. It is a Beautyrest Elite king pillow top with individually wrapped coils. It was almost half the price of the memory foam mattress that we liked, and is super soft and comfy. For now, and for the next decade, it is exactly what we need. We had it delivered for free the next day and had our old one hauled away. We are pretty happy about it so far, but it defiantly needs to be broken in. It is not nearly as soft as the one in the store was. But the great thing with it is if we don’t like it after 90 days we can return it!

 Now, with a new bed comes the fun part (for me at least, Parker not so much) new bedding! We had actually saved a bunch of money from gift cards from our wedding two years ago, knowing that we would one day have to make this purchase. So it was fun to not have to hold back because of cost. We went with a duvet from Crate and Barrel. It is actually like their super popular one right now, so I had to special order it wich was a whole debachle. But now that it is on there with our new grey sheets and old quilt I am in love with it! What do you think? Here are some detail shots. As you can see, after all of this, I am still using those pillows I got on sale at Dillards years ago!


 Now that we have the bed all set up we need to make a headboard. I am going to attempt that this weekend. We also need to adjust a few more things in the room. In the end I think we have done a great job of combining our styles to make a room the modern and comfortable for both of us. Can’t wait to start on the next project! 


Wednesday, September 26, 2012

On The Rocks


Today I took on a more ambitious project than I thought.  For a while now I have been annoyed when I take out the trash and recycling barrels in the morning.  They are wobbly and on uneven ground they keep falling over as I try to pull them in my rush to work.  The side of the house just has mulch, about 6 stepping stones (seen above) and a random rock about the size of a head- or so I thought.  I decided today I would start this project and begin by taking out the rock and see what I thought of using these red stepping stones to create an even path through the mulch to the driveway for the trash cans.  

So I began by digging up the relatively small rock right by the driveway blocking my path.  Simply pulling it out was not an option.  So I grabbed a shovel and started to try and loosen it.  As I used the large shovel and a small gardening shovel to start finding the edges I began to realize- maybe this rock is not so small.  About a half hour later I had managed to free enough of the rock to get my shovel underneath it and to start using the shovel as a lever to lift the rock out.  But the rock barely moved and my shovel started to bend.  So I continued to excavate the large beast that wouldn't stop growing.  I soon learned that parts of the rock were trapped under large roots and piping for the sprinkler system which doesn't work!  

Thankfully Mike (my neighbor) got home about this time and offered some random tools which I would never have even considered buying!  We got lucky a contractor lives next door!  He had a rock bar (oversized crowbar) and a giant lever system.  After using the rock bar to lift enough of it out of the ground, we were able to use the giant lever system to free the rest of the rock and force it out of its cave.  


Then came the big question- what do I do with it now?!  Considering this behemoth weighs probably over 200 pounds, we barely were able to get it out of the whole and over next to the house.  And there is shall rest until I figure out what to do next with it.  Check out this hole!!


After that I took a break.  Then I started filling in the hole with mulch and dirt from the backyard.  By using those materials in the backyard I inadvertently started another project today as well!  More on that later.  I filled in the hold with the dirt and used the remaining four red stepping stones to initiate my walkway.  Not sure when I will buy the rest of these and finish this project.  I hope to work on it and have it done sometime in October though.


Thursday, September 20, 2012

This is where we have been...

I know it has been a while since we have posted. I thought I would let you in on a little secret... Parker and I have been on vacation!

We left earlier this month and are now just getting back into the groove of things.

So where and what have we been up to you ask? Well the first weekend I went down to San Antonio to a work conference, work/fun conference is more like it. It is always nice to get to see my old coworkers and hang out. Plus I usually get a nice free dinner out of the deal which is always fun. Here is a picture of my view from the 30th floor of the Marriott in SA. I thought it was so pretty:


After the weekend in San Antonio I met up with Parker in Houston for our week long adventure of pretending to know what we were doing while taking care of our niece and nephews. All of them are under the age of 5 and totally adorable. We had a great time with them, but we were wiped out after all of the playing, carpooling, eating ice cream and playing some more! 

The first night there Annabelle made us pictures of our names. I loved them. 


We took Declan to the Zoo and then to get ice cream. He had so much fun, as you can tell! 
We put the kids to work, making them do the grocery shopping for us. 
And at night we would snuggle and be sweet... 
Or maybe not... 


We had a wonderful time on our vacation and we loved getting to share in so many fun activities that we never would have gotten to do if we had not been there all week. I am so glad we were able to give Heather and Preston (my sister and brother in law) a quick and well deserved vacation. We are recovering from exhaustion well and I will be back with fun house projects, including home made artwork for our anniversary in just a bit! 

Tuesday, September 4, 2012

Done!

Behold, two months later I give you the table!!!! I had no idea what I was getting into but I think in the end it came out beautiful. I am in love with my new/old table!

I sanded and added two more coats of stain and then two coats of poly. What do you think?

I love it. Like LUUURRRRVVV it.

So you can see the change in color. It does not comeout well but the chairs are much lighter than the table now.

I have lots more to show you that we have done around the house. Sorry to be MIA lately but I am back and trying to post more often!

Friday, August 10, 2012

Step 2: When I almost loose an eye

So now we are at the point of the table saga that I should begin to see the fruits of my labor. Well, the thing is, I am luck that I can see anything at all.

You see, as I mentioned in the first post about the table, there were a lot of nasty chemicals involved in this process. After stripping the wood down you then must use 1000% steel wool to scrub down the whole thing and get all the little bits of old varnish off the table. As I began doing this step at night in our garage, in the heat, I was beginning to get to hot to wear all the protective gear I did in the first step. This time no gloves or goggles were being utilized. This is not something I recommend to anyone. Ever.

As I pulled the steel wool out of the can to get scrubbing some of the chemical after wash splattered on my face. At first I was just startled by it, but did not feel anything. Then the burning of the after wash (which is like mineral spirits) started to kick in. I managed to not get any in my actual eye but there was a few drops on the lid and under my eye. I quickly proceeded to the kitchen and told Parker to get me some face soap. I flushed my eye out for about 10 minutes and washed my face. This is all going on while Parker is reading on the can that I am supposed to go strait to the ER.

I felt fine though after getting the stuff off my eye and face. I do have to admit it was a close call and stupid mistake. Parker was pretty mad at me and told me to stop the project all together. I just could not give up.

So back to the action I went. I tested out a few different stains and decided to go with a slightly darker one than I had originally planed on. Here it is on the base:
Here is a shot of the top about halfway through. This shot really shows you how light the natural wood is next to the finish I put on. It actually made me a bit worried at first.

As you can see the top is a bit lighter than the bottom in the end.We can not tell if it is because the bottom has more grain in it that the top. I am not really happy with the actual table top. It is almost exactly the same color as the old finish. Parker and I can't believe it. So I have decided to let it dry for a few days and then do another coat of the stain to really darken it up. I wanted it to be much richer than it is in these pictures.

I will show you step three next week. I will be redoing the whole stain thing again and then sealing it up. I hope that there are no more threats on my life and that I will be seeing you all with both eyes for a long time!

Thursday, August 9, 2012

How Very Mad Men of Us

Parker and I have been having this argument for the last few months about how to store our things in our master bedroom. See, the issue is we have two closets. On in the bathroom and one in the bedroom. Right now that, plus our super old Ikea dresser works just fine. BUT alas we will not have that luxury for too much longer as we have HUGE plans for the master bathroom (and the closet therein).

So I began hunting for ideas for storage solutions for the master bedroom. One is to do a copy cat situation of my favorite blogger old master bedroom and install two Ikea wardrobes on either side of our bed to make up for the potential lost closet in the master bath.

Click here to see what they did. I love the look and I think Parker and I could totally do it. By the way you will notice, I totally, and shamelessly copied their wall colors as well. I know I am a stalker.

Anyway back to our bedroom. The other day while walking through our local consignment store I cam across these really cool mid-century modern dressers. They were priced at $260 a piece. Totally not worth it in my mind but still super cute. I told Parker about them that night but then just went on my merry way thinking about the built in Ikea wardrobes.

Well last weekend I stopped by to see if those dressers were still there. I was drawn to them for some reason. And there they were sitting up front saying, "Christine BUY ME!" and even better they had been marked down to $189 a piece. I was pumped. Parker came by to see them and also liked them. We both agreed they were a steal, but were not ready to pull the trigger. The next day after going to a few stores including Salvation Army and Goodwill I realized how good of a price those dressers were. So I rushed back to the consignment center and they were still there! Yeah! But wait there is more...

After walking up to the counter I heard two other couples asking the sales people about the dressers. I knew it was now or never. I ran over to the dressers and ripped the tags off and proclaimed them MINE! I then had the audacity to ask if there was any room for negotiation on the price. And the sales lady ended up giving them to me for $160 a piece! SOLD!!!

After rending a Home Depot truck for a total of $14 with gas, these babies ended up in our master bedroom:

9 drawer dresser, and mirror. I am thinking I might change out the pulls on the drawers.
Tall dresser, 6 drawers. I love the look of this one so much.

You can see there needs to be some clean up done to these dressers. But they have great bones.
This shot really shows you some of the damage.
After some polishing up these babies are going to look great and add a lot more usable storage to the house.The reason I told you about the wardrobes is that we are still thinking we are going to install them as well. We are just going to have to be a bit more creative about the space in the room. We don't want it too full of stuff. So down the road we may move the tall dresser into the office or into a babies room when the time comes. But for now they stay parked in out room.

I love the Mad Men feel of these dressers. I love the lines. I imagine Don and Betty Draper smoking cigarettes while dressing for a fabulous party looking in the mirror. I love these dressers.

I will show you how well they cleaned up as soon as I have time to get detailed shots. I think you will be impressed!

Wednesday, August 8, 2012

It gets worse before it gets better...

This week I got on a roll and decided to strip our kitchen table and re-finish it. This was a bad idea. I had no idea how much time it was going to take.

I began sanding it on Saturday and our neighbor saw me in the garage. Being a woodworker, he was intrigued so he came over to talk to me. He quickly noticed I was going to destroy the table. WOOPS. So he put me on the correct path of using a stripper and wood after wash product so I did not change the shape of the table.

I ran out to Home Depot and grabbed everything he told me to get. $75 later I was back in business. Sunday I began to use the stripper. This stuff is nasty and hard on the hands. So with heavy duty rubber gloves and goggles I proceeded.

Fist the stripper (Parker giggles when I say this) was applied using a "Chip" brush. This lifts up the seal and stain in minutes. I then would scrape it off with a shovel type tool. FYI if you wait too long it dries out and does not work, and if you go too soon it does not work either.

After a days worth of work I got most of the base done and the table top was next. This process makes the wood look horrible and destroyed. I was basically in tears while doing this thinking I had ruined this really nice table. After our neighbor came by to check on me he told me I was on the right track so I proceeded. I came to the conclusion it just had to get worse before it got better.

Here is what it looked like after the first and second and third round of using the stripper.

As you can see there were a lot of chemicals involved. Not very earth friendly I know.
As you can see here the wood looked damaged, and uneven. There was a lot of flaking and residue left after this first step.
The base looking nice from far away.
I will follow up with steps two and three later this week. I think you all will be super impressed with my skills.

Tuesday, August 7, 2012

ORB'ed

Oil Rubbed Bronze or ORB is great stuff. This spray paint is easy and quick to use but has a huge impact. It actually comes out looking like ORB metal not paint.


This weekend I grabbed a bottle of it and went to town on Parker's old knight. We have had this thing "gaurding" our house since we moved in together. It is great on the front poorch, but the years of weather and sun have taken their toll.
As you can see here it was covered in rust and dirt.

And after here it is all ORB'ed out! Looks like new! Go Mr. Knight!
Now he can get back to work gaurding our house in style.


Tuesday, July 31, 2012

On the flip side

On the other side of the living room I have updated the fireplace with these items.
I added a large map, and I plan on adding pins of where Parker and I have been. Then our thermometer and clock (also with a map on it) and succulents. I actually have quite a few of these around the house and change out which plants are up there as needed.

In addition, Parker and I found these pillow coves at crate and barrel. We bought them with leftover money from the wedding. I know, crazy 2 years later I am still spending it.
The blanket is from Homegoods, which if you don't know is one of my favorite stores in the world. I was $20! Woot!


What do you think? Up next we are finally hanging pictures in the bedroom, and possibly refinishing our kitchen table. I will post pictures soon!